OAuth2 Setup Guide
Overview
This guide walks you through setting up OAuth2 (Authorization Code + PKCE) to call the eFICA Public API.
You will:
- Create an OAuth2 client in eFICA (so you get a
client_id) - Configure redirect URI(s)
- Implement the OAuth2 redirect + token exchange flow in your application
Access note: Only admin roles can access this settings page in eFICA, and eFICA must enable developer access on your account.
Part A — Create an OAuth2 client in eFICA
- Navigate in eFICA to the eFICA Settings -> Integrations -> Integration Options & Docs page.
- Select the OAuth2 tab and click "Add New OAuth2 Client"
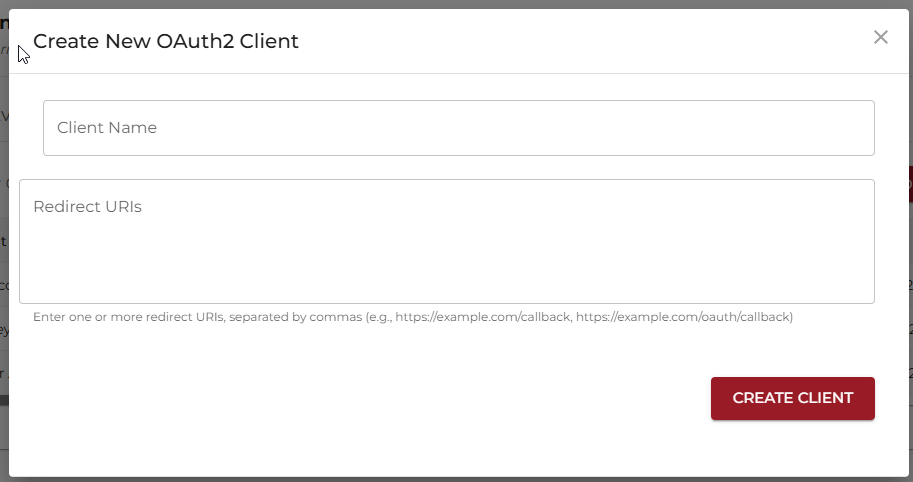
- In the popup screen you will be able to add the name of the OAuth2 client and the redirect URI.
- You will now be shown the Client ID and the Client Secret. The secret will never be shown again so make sure you copy and save it in a secure location.
Step 1 — Open the OAuth2 screen

Step 2 — Create the client and add redirect URI(s)
Step 3 — Copy the Client ID and Client Secret
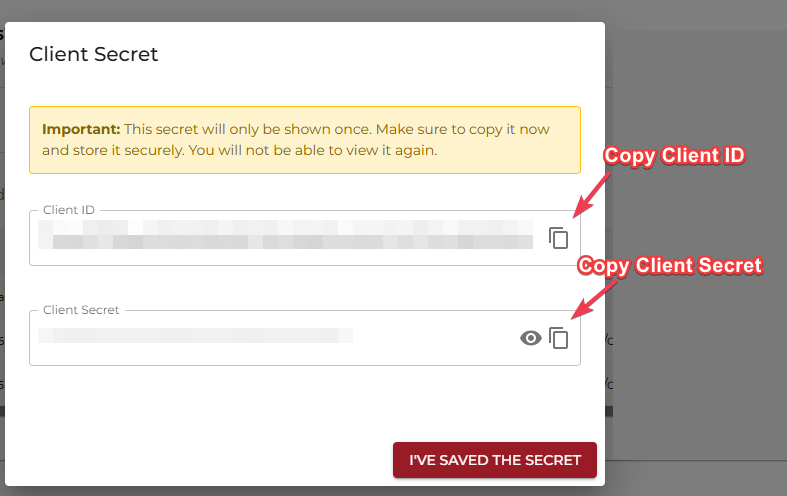
Important: Store the Client Secret securely (password manager / vault). It is only shown once.
Part B — Implement OAuth2 (Authorization Code + PKCE)
Prerequisites
- You have a
client_id - You have at least one allowed redirect URI configured for your client (must match exactly)
- You know your target environment:
- Sandbox:
https://sandboxapi.efica.co.za - Production:
https://loginapi.efica.co.za
- Sandbox:
Step 1 — Generate PKCE values
Generate:
- code_verifier: a high-entropy random string
- code_challenge: (base64url(SHA256(code_verifier)))
Store the code_verifier temporarily (e.g., in the user session) so you can use it in Step 3.
Step 2 — Redirect the user to eFICA to authorize
Send the user to:
GET /oauth2/authorize
Query parameters:
client_id(required)redirect_uri(required)code_challenge(required)code_challenge_method=S256(required)state(recommended)response_type=code(recommended)
After login/approval, eFICA redirects back to your redirect_uri with:
codestate(if provided)
Step 3 — Exchange the authorization code for tokens
Call:
POST /oauth2/token
JSON body:
grant_type=authorization_codeclient_idredirect_uricodecode_verifier
Response includes:
access_tokenrefresh_tokenexpires_in
Step 4 — Call the Public API with the access token
Add header:
Authorization: Bearer <access_token>
Then call a public endpoint, for example:
GET /api/v1/billing/{partnerUUID}/balance
Important: External partners can only access their own data. If the partnerUUID does not match the partner linked to your token, you will get 403 Forbidden.
Step 5 — Refresh when the access token expires
Call:
POST /oauth2/token
JSON body:
grant_type=refresh_tokenclient_idrefresh_token
OAuth2 Actions
The following actions can be taken for your OAuth2 endpoint in eFica. (see step1 image actions column for reference).
Edit (pencil icon)
- Change the user friendly name of the OAuth2 client
- Update or change the redirect URI
Reset Secret
- On click a confirm dialog will be displayed. If
Cancelbutton is selected no actions will take place if theResetbutton is selected a new Client secret will be generated.- The old previously existing secret will no longer work.
Deactivate/Reactivate
- You can toggle an OAuth2 to be either active or inactive.
Delete
- You can delete an OAuth2 client. This is permanent and cannot be undone.
Troubleshooting
- I cannot access this page: Ensure your user is an admin and developer access is enabled for your account.
- Redirect URI mismatch: The
redirect_uriin your request must match one of the configured redirect URIs exactly. - 401 Unauthorized: Access token missing/expired/invalid.